


How to Make a Greenery Wedding Backdrop

How to Make a Greenery Wedding Backdrop
Do you want to give your wedding décor one more touch of elegance? You can construct this stunning, straightforward foliage photo backdrop in less than an hour.
This would be a fantastic addition to your altar or a great place for your thrilled guests to take selfies!
What You’ll Need to Make a Elegant Wedding Backdrop
Let’s start by getting your supplies and materials together. You’ll need the following to create this DIY backdrop:
- Two Exquisite Designer Flower Cases
- Two exquisite designer flower boxes
- Two Flower Boxes for Supporting “Shades of Emerald & Tawny Beige”
- Three Flower Boxes for Supporting “Emerald & Tawny Beige”
- Three Deluxe Greenery Combo boxes
- Five of the Accent Combo’s boxes
- Ten boxes of bushes with greenery
- Blocks of floral foam (we used 9) wire mesh
- Two flower stands (you can choose the sizes; we used a tall and a short one).
- The scissors
- Pliers for green zip ties
- Your Ingenuity
You can display your style, taste, and inventiveness at your wedding. The creative flower boxes from Flowersarch are the ideal beginning kit for making your unique floral design instead of conventional wedding décor. A box and color scheme for every wedding vision is available in various sizes, shapes, and hues.
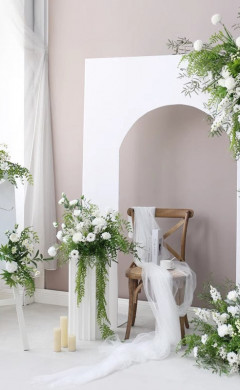
We utilized emerald and tawny beige designer flower boxes to create this sophisticated backdrop, but you can make your own using any of our more than 12 color schemes!
How to Make a Greenery Background Step-by-Step
Whether your wedding is a boho-chic or classic romance, you can easily match your theme with this 6-step instruction that will help you create a stunning background!
Step 1. Wrap the Foam Blocks
Wrap a single block of floral foam with wire mesh. Make sure the entire block is covered with mesh. To prepare them for the following stage, you will do this to every other foam block.
Step 2. Attach Foam Blocks to the Flower Stands
Place one block of wrapped foam vertically into the shortest flower stand. After that, use cable ties to fasten it to the stand, then use scissors to cut off any extra.
Repeat these steps as you fasten each foam block to your two stands. The shortest stand should have one foam block in the center and two mesh foam blocks on the bottom.
The tallest stand should then have two mesh blocks fastened at the bottom. Then, arrange four blocks from the middle to the top of the stand, leaving around 5 inches between each block.
Secure your block in two locations to ensure your arrangement is strong and endures through the wedding day.
Step 3. Add the Greenery
It’s time to include your plants now. Please take a few branches of greenery and start inserting them into the sides and top of each block of floral foam. As you cover the stand with branches, pay attention to its shape. Make the bottom of the stand appear fuller than the top if you want to give the background a more organic appearance.
Tip: Cut a few inches from the stems of a few foliage leaves. For the following step, save those stems in a pile.
Step 4. Attach Flowers to the Stems
Please select your preferred flower and affix it to one of the stems you made earlier. To accomplish this, fasten the flower to the stem using the zip ties. Your bloom will appear longer as a result. To make the arrangement neater, you can cut off the zip tie’s tail after it is fastened. For the majority of the flowers in your arrangement, use this technique.
Step 5: Add Flowers
It’s time to fill in the spaces left by the greenery by inserting the long flowers into the foam blocks on your stand. By continuing to reduce some of the stems, you can produce blossoms of varying lengths. This will give your arrangement more depth.
Step 6. Finishing Touches
Here, you will take the leftover flowers from your arrangement and scatter them throughout the entire arrangement by placing a flower of each color within the stand. Remember that the arrangement will look more realistic if the plants are chopped to varying sizes.
Adding fruits, branches, and additional leaves is the final stage in creating a vibrant and aesthetically pleasing arrangement. After this is finished, you will have two gorgeous backdrops for your wedding.
And You’re Finished!
Well done! You’ve just completed your original floral arrangement. To finish your wedding décor, we advise showcasing the design next to other floral arrangements.
We sincerely hope you like our do-it-yourself wedding backdrop concept. Please let us know how it went if you give it a try, and feel free to tag us on Instagram at @flowersarch to share your unique take on our leafy background concept.
We recommend using the pre-made wedding backdrops available on our website if you need more time to create your own.