


How to Make a Freestanding Floral Arrangement

How to Make a Freestanding Floral Arrangement
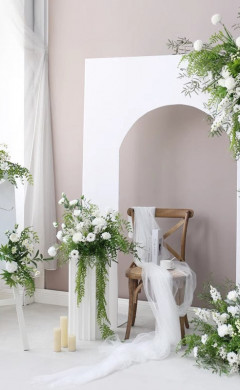
On your wedding day, striking and exquisite freestanding floral arrangements and a charming welcome sign greet your thrilled guests. The intriguing fissure at the threshold assures them of a visual feast!
This freestanding floral arrangement tutorial will teach you how to create elegant and simple artificial flower arrangements. Use these flowers to fill in any voids in your venue and give your wedding ceremony a little extra flair.
Benefits of Using Artificial Flower Arrangements
Artificial flower arrangements are beautiful because they are lightweight, simple to assemble, and, most importantly, durable. Because they are lightweight, you may effortlessly move them from the ceremony to the cocktail hour and even the reception. Taking down and switching between events can be less stressful if your décor is adaptable and flexible. Additionally, you may use your fake arrangements as house décor or for other important occasions in the future!
Artificial flower arrangements are also perfect for outdoor weddings! They are allergy-friendly, will keep their shape in the event of rain, and can shield your guests from inquisitive bees.
Let’s begin creating your do-it-yourself floral Arrangement now!
What do I Need for DIY Flower Arrangements?
The following supplies will help you create your own gorgeous do-it-yourself flower arrangement:
- Two do-it-yourself flower boxes: Navy and Sarah Dusty Rose
- Three cartons of willow leaf garland
- Your preferred accent combination (optional)
- A big block of floral foam will serve as the foundation
- Cutter wires
- A dash of creativity
Any of our DIY flower boxes inspired by each season can be used to create your Arrangement. You can locate the most complementing floral combinations to make your wedding day stylish, regardless of whether you’re an autumn bride seeking warm, earthy, and elegant flowers or a summer bride seeking bright, classic flowers!
How to Make Artificial Flower Arrangements
Finding your favorite artificial flowers and placing them inside a vase or foam base is all it takes to create an artificial flower arrangement. If you’re looking for some inspiration on what flowers to utilize for your special day, our wedding color collection offers a wide range of unique florals that you may use to style every square inch of your event.
How to Start Crafting Your DIY Flower Arrangement
Step 1. Cut down your greenery branches into varying sizes
After removing the greenery from each box, trick the branches into various lengths. Place the longest branches on the floral foam block’s farthest corners and edges.
Gradually include more willow leaf greenery into the Arrangement to form a desired shape at the base. Make sure the Arrangement is as asymmetrical as possible for a more organic appearance. You want the flowers in your Arrangement to look natural like they’re growing out of the ground.
Step 2. Prepare your flowers and insert them into the Arrangement
It’s time to include some flowers now! Before you start, you must trim your flower stems to the ideal height for your Arrangement. We advise combining flowers with short and long stems to give your arrangement depth and character.
Add a variety of flowers to start the fun! One by one, start by inserting your dusty roses, white ranunculus flowers, and navy blue Austin roses into the foam block’s base. The tallest flowers you have can be added first, followed by progressively smaller ones. Make sure to alternate between colored and light florals to add variation to your color scheme. This will make the Arrangement more striking and lifelike!
Enjoy this step! Spend some time letting your creativity and imagination run wild. Creating a floral arrangement may help you relax.
Step 3. Fill in the Gaps
There might be some apparent spaces between the flowers you’ve added at this process stage. However, there is a fast solution. To make the Arrangement appear fuller, insert additional branches and greenery between each gap. You can always re-insert your flowers till you’re satisfied with the form if you’re not thrilled with the overall appearance!
Step 4. Add in Embellishments
You have nearly finished your Arrangement. To truly bring your do-it-yourself floral Arrangement to life, it’s time to add some entertaining accents!
Distribute any remaining flowers, foliage, and accent flowers throughout your Arrangement. Create the freestanding Arrangement of your dreams using all of your artistic abilities! You can design as much as you want.
And You’re done!
Excellent work! Congratulate yourself for creating such a lovely, freestanding floral arrangement. As many of these as you like can be made. You can put them next to your dessert table, at the end of your aisle, or in your cocktail area. Your arrangements will liven up the room, no matter where you choose to put them.
Show off your Fabulous Floral Designs
You would like more freestanding floral arrangements for your special day but need more time to produce them all. We’ve got you covered, so don’t worry. We offer a variety of seasonal pre-made freestanding floral arrangements so you may begin styling the wedding of your dreams. We recognize how busy a busy bride can be!
Choose from beautiful bushels of pink peonies and cream roses to accentuate spring romance or tropical orchids and vibrant greenery for a summer party. Regardless of your bridal taste, you have countless possibilities to ensure that your wedding day décor is excellent!
For more entertaining and stylish wedding tutorials, visit our do-it-yourself blog. You can also share your do-it-yourself bouquet with us by following us on Instagram at @flowersarch and tagging us in your unique floral creations.