


How to DIY Floral Wedding Arch

How to DIY Floral Wedding Arch
The focal point of the ceremony is a wedding arch. In front of your friends and family, you and your significant other will exchange vows, beginning a new chapter in your life. The arch should reflect your ceremony’s aesthetic and your sense of style. Our realistic and reasonably priced flowers make it simpler than ever to design a unique DIY wedding arch for your special day.
Today, you will discover how to use Flowersarch flowers and foliage to create a DIY floral wedding arch (see our wedding flowers as well). We employed a two-piece arch to facilitate setup and assembly. It’s perfect for important events like wedding ceremonies and receptions. Learn everything you need to know by reading on or get practical guidance by watching our step-by-step video.
What you’ll need to create a wedding arch
- Eight flower box sets from Flowersarch
- Ten sets of flowers, arches, and greenery branches with two arch pillars
- Chicken wire or wire mesh
- Muds made of flowers
- Zip ties
- Pliers
- Your radiant smile
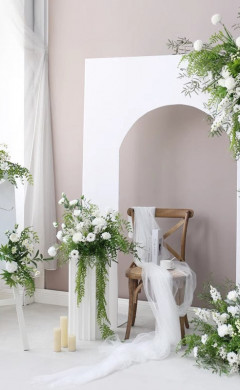
We decided to use white and ivory flowers to achieve a timeless, unadulterated look for our wedding arch. However, you can use any flower and plant combination you desire. We advise eight boxes of greenery and at least ten boxes of flowers, but you can use more to give your arch a more complete appearance. You may need more flowers and foliage to create a floral arrangement if your arch is larger than the one in the video, which is around 6 feet by 6 feet.
How to DIY floral wedding arch
Step 1. Make the base with flower mud
We’ll start by creating the foundation for your do-it-yourself flower arch. Pile at least seven pieces of flower mud on one side of your arch. Next, wrap the floral dirt with wire mesh and fasten it with zip ties. Verify that no sharp wire edges are sticking out.
Advice: Your arch’s base should be thicker than its top. This will increase stability and give your arch a tapered, natural appearance.
Step 2. Cover the whole arch pillar with flower mud
On the opposite side of your arch, repeat the same procedure. Build a base out of floral dirt and fasten it using zip ties and wire. Continue doing this until the entire arch pillar has been coated.
Advice: If you currently have lumps and bumps on your form, don’t worry. Later, we’ll cover them with flowers and plants.
Step 3. Insert greenery leaves into the flower mud
Now that your arch’s bare body is finished, it’s time to begin decorating! First, we’ll apply foliage over the floral mud.
Place the green leaves in the flower dirt evenly. Aim for a 30—to 45-degree angle when inserting them. This will make your foliage appear to be sprouting from the base of the arch. Work your way up to the top of your arch, starting at the bottom. Make your greenery bigger at the bottom to give it depth.
We advise utilising a variety of vegetation. This might give your arch more depth and variation. Use your best judgment for a unified, blended look. After completing one side of your arch, proceed to the other side.
Advice: Don’t add the most extended and enormous foliage branches yet. Later, we’ll employ those as a final touch.
Step 4. Add more leftover leaves to the base
Cover any exposed flower dirt or wire with any remaining leaves on your do-it-yourself wedding arch. Focus on the arch’s base, which should have the most lush vegetation. After using up all of your greenery, it’s okay if there are still some obvious gaps. Later, we’ll hide them with flowers.
Step 5. Insert flowers into the gaps
After the arch’s main body has been covered with foliage, it’s time to add your flowers. Take out your flower box sets and start dropping flowers, one by one, into the spaces. Proceed one box set at a time to make things simple. You can evenly distribute each flower type throughout the arch or form clusters of the same flower types. This also applies to flowers of various hues. It all depends on your own vision.
Take caution to make sure your arch’s two sides are symmetrical. Although they shouldn’t appear alike, each side should enhance the other. Don’t be scared to experiment with different flower placements. The stems can be angled to face your flowers in various directions.
Step 6. Insert the longest branches near the base
You’re almost done with your arch! After you’ve arranged all the flowers and greenery, it’s time to add the finishing touches. To avoid making your greenery too symmetrical, place the longest branches close to the base of your arch.
Add tie bows or ribbons in colours that complement your flowers to finish your arch. Your style and your idea for your wedding arch will determine everything. The only restriction is your imagination!
Step 7. Finish!
Enjoy your lovely new flower arch, which you made yourself! The arch is an excellent backdrop for wedding ceremonies. Still, it can also be used for photos during your reception, to adorn the venue’s entrance, or wherever else you need a lovely floral centrepiece.
Because it is made of two sections, the arch’s two sides are easily transportable and may be arranged anywhere. Additionally, after your wedding ceremony, you may use our realistic flowers and foliage for birthday celebrations and baby showers, as they always stay strong.
Don’t want to make your floral arrangements? Check out our selection of arch flowers. Our pre-arranged arch flowers are in lovely, classic styles only for your wedding arch. To get ready to walk down the aisle, tie them to an arch. For brides who are pressed for time, it’s a sophisticated answer.
To showcase your creations, tag us on Instagram or Facebook. We always enjoy seeing your lovely creations using our flowers and foliage. It’s a privilege to be a part of all your Flowersarch!