


How to Decorate a Wedding Arch | Try this DIY Wedding Decor Hack

How to Decorate a Wedding Arch | Try this DIY Wedding Decor Hack
Let's prepare for the ceremony, which is the centerpiece of your wedding. In addition to being the setting for your happily ever after, the ceremony arch will be a prominent feature in your wedding photos. A stunning wedding arch is an essential component of any design.
This unusual wedding arch creates a striking and modern background with a circular hoop foundation. In addition to being memorable and stylish, it's also quite photogenic. The finest aspect? It's simple to make yourself with Flowersarch flowers, fabric, and foliage.
What you’ll need for this DIY wedding decor hack
Let's start by getting your supplies and materials together. This circular hoop arch requires the following:
- Six Designer Flower Boxes: Two Basic Flower Combos: Brilliant Amber and Lilliana Terracotta Grand Box x4 and Dahlia Sunset Terracotta Box x2
- Two boxes of foliage garlands with 6-foot willow and eucalyptus leaf garlands
- Two Boxes of Greenery Branches: Long Leaf Eucalyptus
- Three Greenery Combinations: Fall Sunset Greenery.
- One omber arch drape box Pliers for Sheer Drapes
- Floral foam and wire mesh
- Ties for cables
- Clamps for scissors
- A round arch frame for a wedding
- Your inventiveness
Our arch was made using our sunset terracotta collection, but you could simply use your preferred wedding colour scheme, such as dark teal and burnt orange or English pastel. To make it simple for you to personalize your style, each of our designer colour groupings has a distinctive assortment of flowers and textiles.
How to decorate a wedding arch - step-by-step
Step 1. Drape the First Fabric Piece
After gathering all of your materials, it's time to start the exciting process of making your arch a reality. First, let's drape the fabric over your arch frame.
Using the frame as a clock is a terrific way to decorate a bridal arch.
Just to the right of the noon position, drape one piece of fabric. Stretch the fabrics that face inward to the 8 o'clock position and those that face outward to the 9 o'clock position.
Using a clamp, secure the cloth to the arch after folding it so that each piece hangs outward.
Step 2. Drape the Second Fabric Piece
Over the eleven o'clock position, drape a second piece of fabric.
Stretch the portion that faces inward to one o'clock and the piece that faces outward to four o'clock. Attach the cloth to the arch frame using clamps.
Advice: To make the fabric appear fuller, pull it at one end.
Step 3. Attach Floral Foam to the Arch
Let's now embellish your arch with floral arrangements. Making a foam base will be our first step.
Secure a piece of floral foam to the arch frame using cable ties after wrapping it in wire mesh. Use scissors to trim the extra.
To construct two sizable floral foam portions on either side of the arch, repeat this procedure.
Advice: Using visual contrast to create an intriguing and sophisticated look is one of our favourite methods to decorate a wedding arch. To do this, make one of these areas of floral foam larger than the other.
Step 4. Add the Greenery
We'll start by creating a base of foliage because we want the flowers to be the main attraction of our arch.
Cut your vine garlands into smaller pieces using pliers. Most of the pieces should be cut into 5- to 10-inch lengths. To make two smaller and one somewhat larger cutting, save a fifteen-inch chunk. These will be used to add dimension and depth.
It is now time to place your prepared greenery into the floral foam. Keep the center of the foam free for flowers and concentrate the branches on the sides. To provide depth, place the larger pieces in the middle and the shorter pieces toward the edge. On both sides of the arch, repeat the procedure.
Step 5. Add the Flowers
The most exciting step is about to begin: adding the flowers! You'll need to use delicate floral arrangements to adorn a bridal arch.
Start by placing your larger flowers in the center of the arrangement, then encircle them with smaller flowers of different hues. This will produce a lovely cluster of flowers.
In each piece of foam, make several flower clusters. A unified, harmonious flower group should be formed by the union of the various clusters. To achieve a flowing, natural appearance, try to change up the flowers' positions and angles.
Save your smallest flowers for last, but continue until you've completed the majority of the arch.
Advice: It's acceptable to have leftover flowers and greenery. Later on, we'll use those to make matching flower arrangements for your arch.
Step 6. Add Details
Let's apply some last-minute finishing touches to the arch's primary body.
To highlight the focal point flowers, add smaller flowers and additional foliage branches to your foam. The accent pieces and little flowers included in your creative flower boxes will give your arch more visual appeal and diversity. Although it's a small feature, it adds coherence and beauty to the entire appearance.
Lastly, gather the draperies into tidy fabric pools by tying them on the floor.
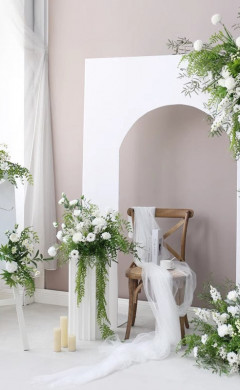
Step 7. Add Floor Decor
Your wedding arch is finished with that! Let's now accessorize the floor underneath the arch to finish the ensemble. This will give your wedding background a more romantic appearance than just the arch.
We'll utilize the same flowers, greenery, and floral foam that you used for the arch to create these additional floral arrangements.
To begin, lay a piece of floral foam horizontally, with the longest side facing the floor. Leave room for flowers by inserting leaf branches of various lengths around the foam.
Arrange the flowers on the foam using the same cluster technique. Use flowers and embellishments to fill in the blanks, creating as many additional floral arrangements as you desire or have available.
Place your extra floral arrangements beneath the arch, with candles and candleholders positioned between each one.
All finished!
And there you have it—a stunning and fashionable wedding arch that you made yourself. Your wedding day will have a unique and customized touch thanks to your bespoke wedding arch.
If you want to show us your latest arch designs on Instagram, please tag us. We hope that your precious moments will be enhanced by this do-it-yourself wedding arch!
View our prefabricated wedding arch decor if you lack the time to create this arch yourself. With the help of lovely floral garlands and fabrics, you can effortlessly arrange your wedding arch and use the time you save for other wedding-related tasks.